Shop Made External Laps
* GadgetBuilder.com * © 2014 by John Moran
Last Modified:
Shop Made External Laps
At first glance, lapping seems like a peculiar way to improve the accuracy and surface finish of turned parts. It uses simple, some would say crude, tooling yet can improve accuracy and surface finish to well beyond what one can produce on a lathe with a cutting tool. It is a random process that produces predictable results in specific applications. In 2009 Rollie Gaucher made a presentation to our CTHSM Group on lapping. Errol Groff posted videos on the NEMES site of Rollie's 2008 presentation on laps and lapping along with pictures of some laps Rollie has made. More info on lapping (by Duplex) can be found at Model Engine News.
In my shop, lapping's first appearance came with the helix sharpener for the Brooks cutter grinder. I tried twice to accurately ream the cutter holder's interior to size before borrowing barrel laps from a friend in CTHSM. At the time I still hadn't figured out how helpful lapping is when you need an accurate, consistent size over a length so I used carbide paper and oil to adjust the OD of the cutter holder - something that, in retrospect, would be relatively quick and easy using an external lap.
In lapping one charges a soft lap with abrasive and applies it, with lubricant, to the work. The lap and work conform to one another through the action of the abrasive. Starting with roughly circular lap and work, given time and reasonable technique the lap and work will become perfectly circular. That is, any lobing or other surface irregularities are automatically reduced by the random contacts between the high spots on the lap and work. Lapping proceeds relatively slowly compared to normal turning so it is straight forward to adjust diameter by very small amounts.
 Further it is easy to feel differences of a tenth in the diameter as the lap is moved over the work surface, allowing one to concentrate on high spots to rapidly achieve constant diameter over the length of a round part.
It makes sense to get a good surface finish prior to lapping. Typically leave 1.5 - 2 thou to be removed by lapping. Lapping proceeds relatively rapidly at first because the lap is removing the top of tooling marks but as lapping proceeds more metal must be removed to achieve the same reduction in diameter. Generally lapping slows considerably when you attempt to remove more than about 3 thou because the machining marks are gone so the lap is working on solid metal. Materials and tooling marks differ so it often takes some trial and error to establish how much material to leave for lapping. Lapping also improves the surface finish and the improvement can be considerable when lapping removes all tool marks. Lapping works well on hard material, not so well on soft material; the lap must be softer than the work and must hold the abrasive.
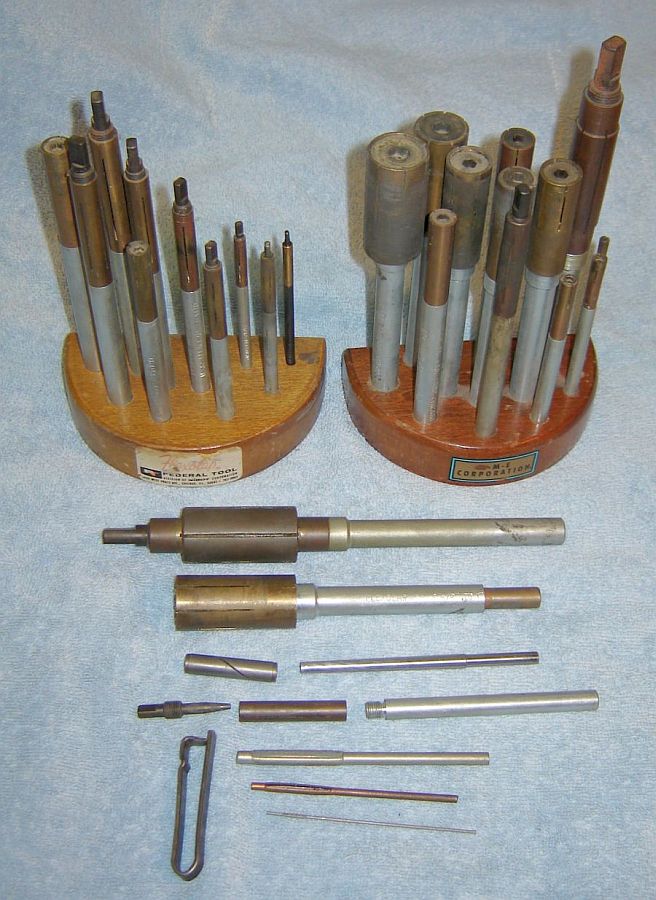
At right are some commercial laps. From the bottom, 3 pin laps; these look like needles with an eye that can be opened to adjust lap diameter. To their left is a tool used to expand the eye on the larger size pin laps. Above that is a barrel lap opened to show how the expander works; the inside has a matching taper to expand the barrel slots from the center. Above that is a spiral lap which is expanded by tapping the tapered pin into the end of the lap - the inside of the spiral is tapered to match. Above that are a 1" end lap and a 1" barrel lap. End laps can be used in blind or through holes, barrel laps are used in through holes. The wood stands hold a mix of barrel and end laps.
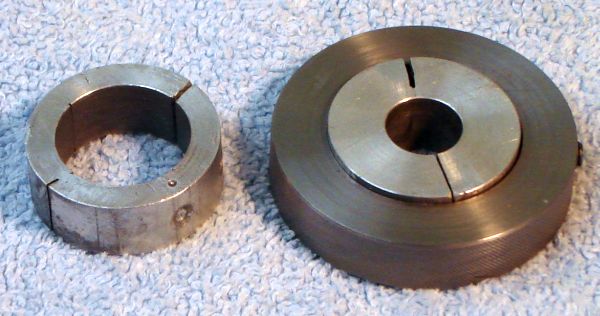
Commercial laps work well but it's also easy to make a simple lap like those pictured at the top of this page. The lap holder shown is a scrap of steel round 1/2" long, lightly knurled on the OD. The lap holder includes a set screw to adjust the lap size and also to keep it from rotating in the holder. I mostly use commercial laps from those pictured at right for internal lapping so see Rollie's laps for shop made examples of internal laps.
The laps shown are made from 1.25" aluminum bored to size and slit. Lapping is a statistical process in which the lap and the work get rounder and in the limit the outcome would be a perfect circle. A little Clover valve lapping compound or dry abrasive+oil works well. Brass might make a better lap but I had aluminum on hand - any soft metal will do. Copper works well as a lap; worn brass or copper laps are sometimes refreshed by applying solder. Cast iron also works well as a lap, see this NEMES pdf for much info on laps and lap making.
I turn the part 1.5 to 2 thou over the target size and verify it doesn't fit :wink: Measure so you know the exact size. Add a little lapping compound, apply the lap to the work at modest RPM - 100 or less will do. Initially the lap will torque with each rev as the lobes get removed. After a minute or so, wipe the lapping compound off with a little WD40 and re-measure, plus check the part. Diameter change is faster at first because you're removing mostly the high parts of the tooling marks. Change gets progressively slower as the tooling marks disappear and the surface gets smoother. About 3 thou is the max I ever try to take off by lapping because the process gets really slow when all the tooling marks are gone and you're removing solid steel. Tighten the lap and add compound as needed to ensure progress. Typically, after a couple lap/measure cycles you get a feel for how long it takes to remove each tenth, so you can estimate how long it will take to get the desired fit. Usually, 5-15 minutes will do it. Don't run at high RPM, heat will affect the fit. Lapping is messy in that your hands get dirty but the grit stays on the lap and work so, unlike a tool post grinder, grit doesn't get on the lathe - making cleanup easy.
The lap should be shorter than the part. Also, keep the lap moving back and forth along the work and reverse the lap periodically to avoid making zones on the work. Lapping can bell mouth a hole if the lap spends too much time near the end of the work, so be alert to this. A little practice and experience is helpful, as it is with any physical skill.
The vertical shear bit produces a nice finish, good for most purposes. When even better accuracy or finish is needed, lapping does the trick for me on both inside and outside diameters.
It is possible to get over-enthused and lap things that don't really need it: I lapped the round tool post on my experimental QCTP to 1.0000" -- so now I can use it to check my dial caliper ;-)
If you have a comment on this site or its contents,
click here scroll down and click again.