* GadgetBuilder.com *
Last Modified:
Click to Enlarge
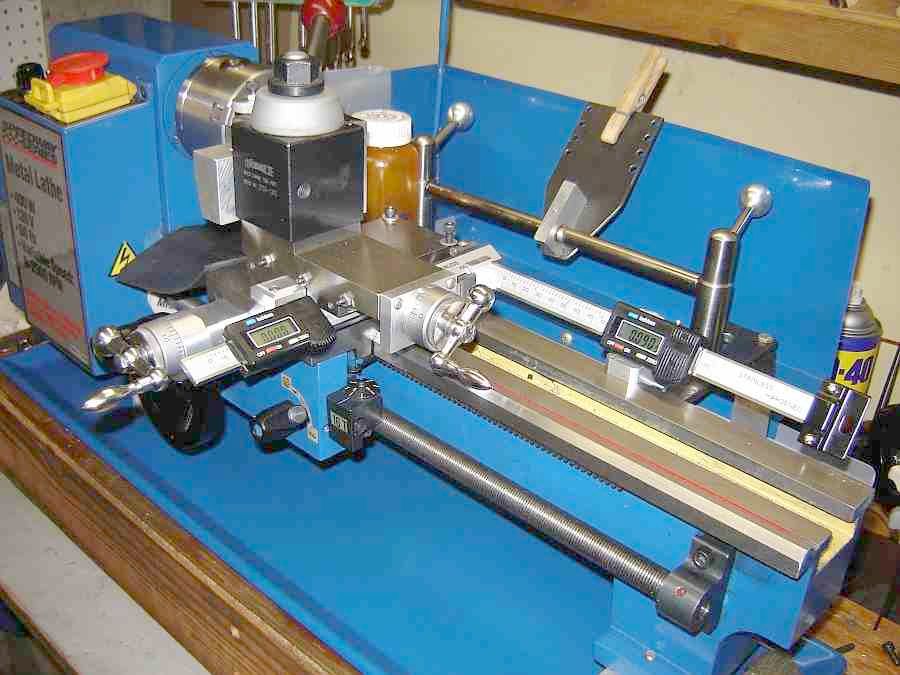
Digital ReadOuts (lathe DROs) are a convenience with the minilathe but the expense kept me from adding them - it didn't make sense for the readouts to cost almost as much as the lathe. Then, I saw a low-cost approach on a German site (which disappeared in May 2009) and couldn't resist; eBay provided two 6" scales for $37 including shipping and the project was under way.
While Mr Schmidt's site provided the inspiration and proof of concept, by the time I completed this mod I had changed nearly every detail. Readers who decide to add DRO's in a similar manner should expect to do the same. There are only 3 brackets (aluminum, the original brackets were steel) required to add the DROs but any previous mods to the lathe may affect the exact shape and position of the brackets - forewarned is forearmed. In my case the tailstock adjuster required minor re-work and the carriage lock was changed to use a cam vs screw lock.
The changes started early: I used scales rather than modifying digital calipers. This simplified things because there was no cutting or drilling of hardened stainless: holes and screws were provided in the back of the DRO display units. The scale looks slightly longer than the cut down caliper but this was accommodated by the extended cross slide spacer, part of my earlier cross slide mod. In retrospect, an 8" scale would be a better choice for the bed DRO.
The front bracket on the cross slide holds the DRO at 30 degrees from horizontal on my setup vs 45 on the original. This was to improve readability and it might have been even better to mount the DRO horizontal; chips don't often make it to this area so the slope doesn't seem to be a major advantage. In the German implementation the bracket attached to the compound via an existing hole but I have the JWE modified compound so I added a hole in the cross slide to secure the front bracket.
The ways clamp/bracket holds the DRO at 30 degrees from vertical. I countersunk the screws on my tailstock adjuster to improve clearance for the DRO (which need not be removed when using the tailstock). The ways clamp uses a cam acting through a lever, simpler than the original design but not so easy to add an adjustment if the throw decreases due to wear of the brass lever by the steel cam.
The rear cross slide bracket (with the CS scale retracted to show the revised carriage lock)is where everything comes together and is the trickiest part to fit. I fit the cross slide to this bracket first by making the 30 degree slot with a slitting saw, then sneaking up on the horizontal and vertical position by successively milling the 90 degree cutout, testing the fit, then milling a bit more. This took a while but resulted in a good fit vertically and horizontally. Then, with the ways bracket complete and the other scale mounted and clamped to the ways I held the second bracket in place and scribed a mark, then milled the slot for the end of that scale. The second bracket was moved as needed while the scale was positioned vertically and a witness mark added next to the slot. A temporary gauge was fashioned (by clamping scrap together) to adjust the second bracket parallel to the front ways, then a transfer punch was used to mark the carriage for drilling. The cross slide brackets use 10-32 screws, the scale clamps are held by 6-32's.
A drawback to this mod is that the tailstock conflicts with the carriage about 3/8" sooner than it normally would; it may be helpful to add a standoff to prevent the tailstock from contacting the cross slide DRO scale.
With a modest number of parts, the devil is in the details of fitting everything together without interfering with something else while ensuring the scales are exactly parallel to the lathe axes.
I found the cross slide DRO very helpful for threading. The DRO does all the remembering if I simply re-zero after each pass, prior to withdrawing the tool -- very hard to get it wrong when advancing the tool for the next pass. Eventually I built the retracting toolholder for threading - so the cross slide DRO is seldom used now.
Mr Schmidt, the originator of this mod, is a very clever machinist to come up with this.
 An unanticipated use for the bed DRO is to set drilling depth when using the tailstock. I move the tailstock up until the drill is touching the work and lock it in place. Move the carriage until the toolpost contacts the tailstock flag. Zero the bed DRO and move the carriage left until the DRO indicates the desired drilling depth. Ensure no conflict with the 3 jaw, lock the carriage, then drill until the flag contacts the toolpost. (There are variations on this theme that don't require the flag...) An off-the-beaten-path approach which I find useful, YMMV. Easier and faster setup than my original scheme.
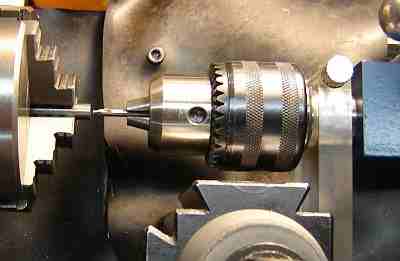
Note that the tailstock flag can be used for drilling to depth without the DRO. Set the drill against the work as shown in the picture. Use a spacer or calipers to set the distance between the tailstock flag and the toolpost by moving the carriage and lock the carriage in place. Then, when the tailstock is advanced until the flag again touches the toolpost you're at depth.
This page was last modified. If you have a comment on this site or its contents,
click here scroll down and click again.