* GadgetBuilder.com * © 2018 by John Moran
Last Modified:
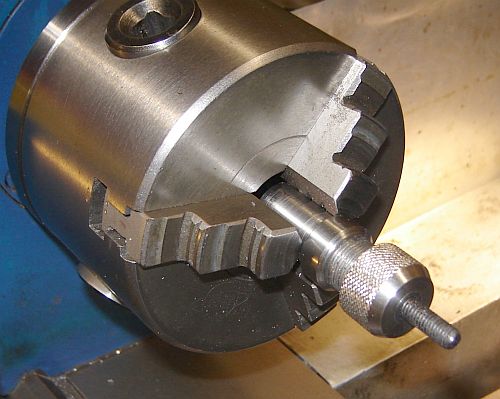
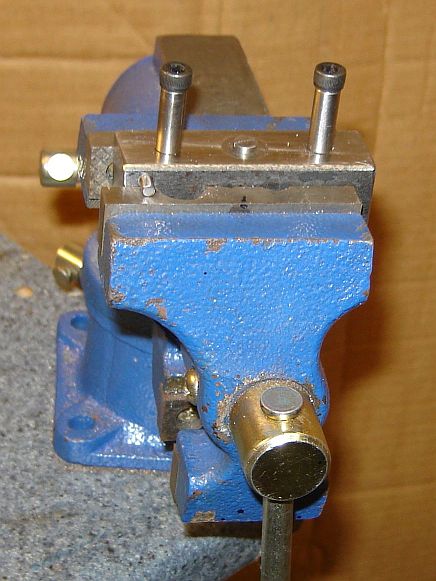
A lantern chuck is used to hold screws while modifying the threaded section. Small inserts are used to accommodate the common screw sizes; in the picture above a #10 screw is held in the chuck while the #4, #6, and #8 size inserts are shown on the clip. For storage the top hat shaped piece replaces the insert in the chuck and the clip along with the inserts is secured to it, keeping all the parts together (as seen in one of the pictures below). Both the lantern chuck and the screw slotter (below) may be of interest to clockmakers.
The design of my lantern chuck is arbitrary. I have a re-sharpened 1/2" end mill with diameter 0.456 so I chose to make the diameter of my chuck 1/2" with the idea that the inside of the lantern nut could be flattened (and a shallow pocket left) with this under size end mill without disturbing the threads in the nut. A 1.5" length of 5/8" round was turned down to 0.500" for 3/4" on one end and 1/2" on the other end leaving a 1/4" band for a stop when inserting the lantern chuck into the 3 jaw. The 1/2" long end was threaded 32tpi -- I leave my minilathe gears set up for 32tpi by default and use 6-32, 8-32, and 10-32 machine screws for most of my projects to minimize gear swapping.
I used a scrap of stainless for the lantern nut. The OD was turned down to 0.7" and it was center drilled and opened with an L=0.290 drill for a depth of about 0.7". This was drilled 7/16" for a depth of about 0.35". The re-sharpened end mill was used to open it further to a depth of 0.4", flattening the bottom of the hole to accept the inserts. The hole was then bored to 0.505" and the inner 0.2" was opened a further 0.050" to clear the threads - this is a generous runout groove for the inside thread. Leave 0.030-0.045" depth of the end mill section beyond the runout area - use the end mill again if necessary to touch things up. I knurled the nut with the cut knurler; if using a pressure knurler it might be best to knurl before drilling the center hole. The inside of the nut is then threaded 32tpi to match the chuck; trial fit as you near completion to ensure it screws on easily until it contacts the end of the nut. Part off at about 0.6". Place the nut onto the chuck body and face the end of the nut. I left a thickness of 0.50" - thin inserts allow working on shorter screws and the insert thickness I chose is 0.100" where the 0.290" diameter is 0.50" thick and the 0.456 diameter section is 0.50" thick also. Chamfer the end of the lantern nut for looks as desired.
 Inserts were turned from 1/2" round which was turned down slightly (for about an inch of its length) until it fit the recess in the chuck nut made with the end mill. This was center drilled with a clearance drill for a #4 machine screw. The end was turned down to 0.290" for a length of 0.050" and the diameter was tweaked to ensure it fit the lantern nut. Then it was parted off leaving about 0.050 length of the larger diameter. Similarly, the next insert was drilled with a clearance drill for #6 etc. for the remaining inserts. By starting with the smallest bolt size and working up in order the drilling depth isn't critical.
This lantern chuck doesn't hold well enough to allow shortening screws with the parting tool, the screw will invariably climb up onto the tool and ruin the insert in the process. I remove just the threads with the parting tool at the point I want to cut it off and then use the hacksaw to finish. Or just leave the lathe off and cut the screw with the hacksaw. Once the screw is cut I turn the lathe on and tidy the cut end with a file. The lantern chuck can be held in a drill press chuck while tidying the end of a screw if the lathe is otherwise occupied.
The original lantern chucks used a longer threaded section and a longer nut where the front of the nut was cut away on two sides leaving a strip in the center. In profile this nut looked like a lantern, giving the chuck its name. More recent incarnations don't bother with the cut away sides and retain the lantern name only because they perform the same function.
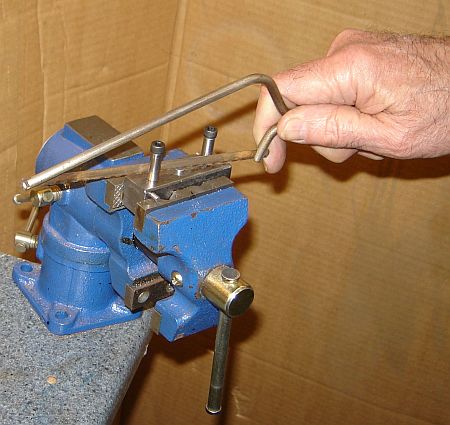
The simple screw slotter shown facilitates adding a slot to the head of a shop made screw. The concept uses 3 evenly spaced holes where the outer two are fitted with rollers so the saw blade can rub against them without damaging them or the saw blade. The center hole accommodates the inserts used with the lantern chuck above to accurately position the screw to which a slot will be added. By holding the saw firmly against both rollers as shown in the picture, the blade will be centered on the screw to be slotted. A few strokes with the saw will add the slot to the screw head.
My slotter is made from a piece of 3/4" square hot rolled steel 2.5" long. This was held in the mill vise and the spindle was centered on one side. A hole was spotted and drilled to clear a 10-32 screw. This hole was opened with an L= 0.290" drill to about 1/4" depth. The re-sharpened end mill (0.456") was then used to spot face the hole to a 0.050" depth; the combination of this and the 0.290" hole will accept the inserts used with the lantern chuck described above. Two additional holes were drilled on the center line of this part, 0.750" either side of the center hole; these two holes were drilled and tapped 10-32.
I could have made shoulder bolts but happened to have some 10-32 socket head bolts with a generous un-threaded section (seen in picture above) so I just shortened the threaded section and used them to hold the rollers. Rollers are 1/4" diameter steel, drilled to just fit onto the socket head bolts with a length chosen so there is about 30 thou movement of the rollers up and down when the bolts are tight. The rollers are a bit over 5/8" long so they work with the small saw shown or with a regular size hacksaw should wider screw slots be needed.
To finish up, two 1/8" pins were press fit, one on each side to make it easy to level the slotter in the vise. Position of these pins isn't critical as long as they're the same distance from the top of the slotter.
It is important to have the saw blade firmly against the rollers with the blade vertical when starting the cut. In addition, the blade should contact the side of the screw head away from the user on the forward stroke so the screw doesn't try to rotate. Once the slot is started the slot will keep the screw oriented with the blade. Confusing to describe but obvious once you start using the slotter.
If you have a comment on this site or its contents,
click here scroll down and click again.