* GadgetBuilder.com *
Last Modified:
A carriage stop is a most useful addition to the minilathe; some time ago I made a clamp to use on the rear ways but hadn't found a design I really liked until I saw EngineMan's (look about half way down on his workshop page). EngineMan is an amazing craftsman and a great photographer so his site is well worth a visit.
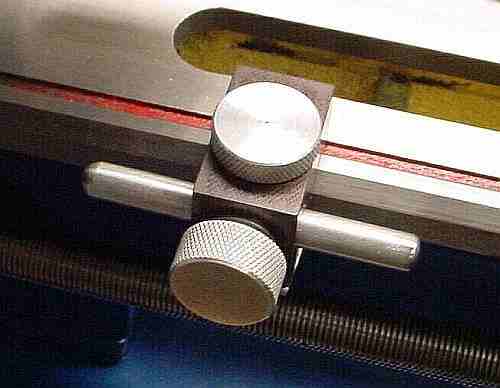
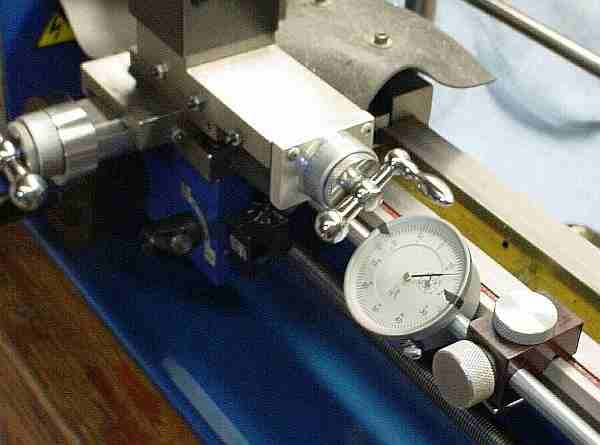
I'm not in the same league as EngineMan so my stop doesn't look as nice but it works fine. I made the hole for the stop large enough to accommodate a dial indicator with 2" travel; when not used as a stop, it can be used to hold the indicator.
The body of my stop is made from a chunk of Tufnol (phenolic resin w/fiber) which is quite tough but turns to dust when machined; EngineMan used aluminum for the body -- anything which won't mar the ways should be fine. (The Tufnol is from "Modern Plastics" in Bridgeport, CT where their $3/lb scrap box contains many treasures; I went there to get Lucite rod and came back with a box of neat stuff in addition to the rod.) Tufnol is a good insulator so it is easy to make an alarm sound and/or light up when the stop rod contacts the carriage. The block I used is 1W x 1.15H x 1.65L. The 0.700x0.390 rectangular section was cut out with a slitting saw, then the triangular section was milled using a 3/8 bit. The block was held for drilling and milling via the vise mounted in the toolpost however an additional hole was needed in the base of the vise to allow mounting so the jaws open horizontally, then it was gripped at 45 degrees and milled using the cross slide travel.
The other parts are fairly simple to make. I used a piece of 1/2" brass for the lock which retains the stop rod, a spigot was turned and threaded 10-32 to accept the aluminum knob which locks the stop rod. The brass was cross drilled to accept the stop rod and the 3/8 mill bit was run through to provide clearance. All this drilling was done holding the part in the toolpost mounted vise with the drill bits and then the mill held in the 3 jaw; the lathe works well as a precision drill press in this application.
The stop rod itself is 3/8" steel, rounded a bit on the ends using the ball cutter attachment. The 3/8 rod size was chosen to be compatible with the dial indicator.
The knurled knobs are 1" aluminum, tapped 10-32. The knob for the way clamp is Loctite'd to the steel shaft which is threaded on both ends. The way clamp is 1/8" steel plate tapped 10-32.
There are a some details to consider in making this stop/dial-holder. The indicator mounted as pictured works backwards, showing lower numbers as the tool is advanced toward the chuck; a 1" travel dial might work to the left of the carriage but I haven't tried this. The dial indicator is very close to the ways so if the 3/8 hole in the body is too low, there is a possible conflict dependent on the shape of the indicator. The way clamp knob, if it is thick, could conflict with the bottom of the dial for the compound; insetting the knob into the body (as EngineMan did) might solve this. In use, with the compound at 90 degrees, the dial indicator and compound dial conflict at about 1.8" indicated travel on my setup; quite usable, but a short extension to the indicator's pickup pin may eventually find its way into the system.
Sometimes I don't realize when the mini-lathe's carriage contacts the stop (under the way protector) and apply more force. I've tried connecting an ohmmeter which sounds a tone between the stop rod and the lathe body; this works fine but the tone should be louder. I'm considering adding a solid state sounder and LED using batteries or a 5v supply located inside near the controller.
If you have a comment on my site or its contents, click here.