© 2002 by John Moran, Newtown,CT, USA
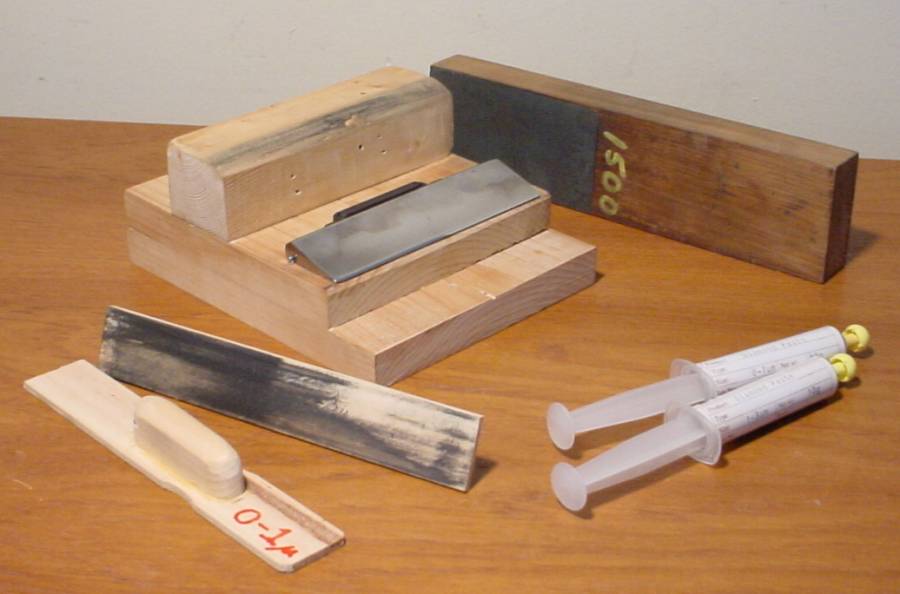
I recently purchased a rotary microtome on eBay which included a knife but did not include the handle or the bevel/holder normally used to sharpen a microtome knife. This knife was in fair condition so it required honing as well as stropping prior to use. I used Prof. Ellis' microtome reference to decide how to go about sharpening the knife. Since I didn't have the standard holder I constructed my own; the result, which is not at all like the standard holder, is shown below (with strops and hone). The goal of this holder design is to minimize the operator skill needed to sharpen a microtome knife, necessary since I had never seen a microtome knife prior to sharpening this one.
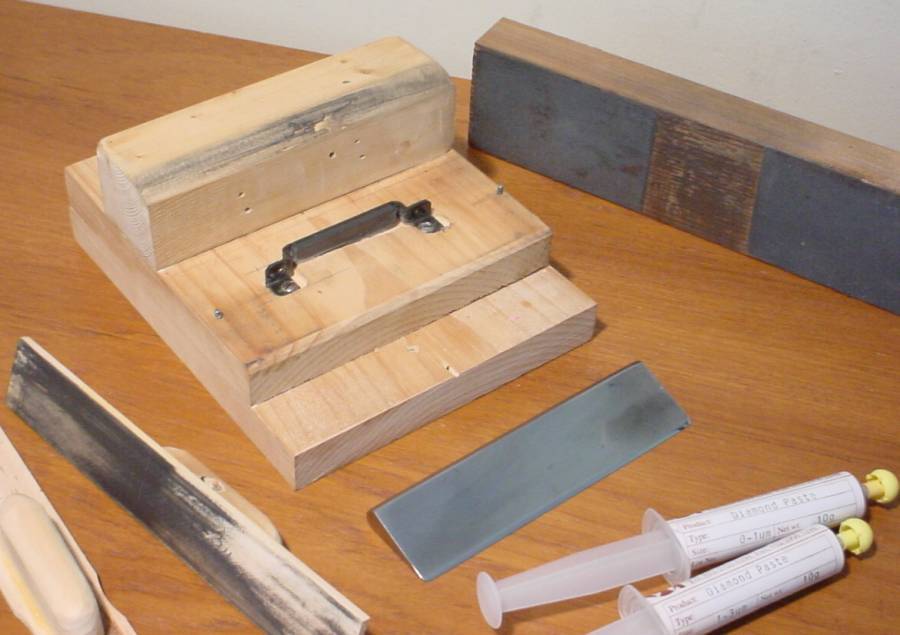
The upper block is a guide for the upper end of the hone or strop which fixes the angle between tool and knife. The lower projection (the lowermost layer) is meant to prevent the tool from being rolled over the edge of the knife inadvertently. Note that the edge of the knife is back slightly from the edge of the supporting block -- this to reduce the danger of contact with the knife edge while it is in the holder. The knife is held in position by a magnet and is prevented from moving sideways by small vertical pins. In use, the upper end of the hone or strop is kept in contact with the upper block while the abrasive section of the tool is in contact with the knife, thus ensuring that the angle built into the holder is transferred to the knife.
CAUTION: Handling or unconsidered movement near any microtome knife is hazardous.
The holder described here is NOT SAFE to use and cannot be made safe.
Build and use at your own risk.
My technique when moving the microtome knife about is to grip it with two hands, one on each end. This keeps both hands occupied and away from the cutting edge while also minimizing the chance of dropping the knife (which could easily sever a toe). I found that I could shave hair from the back of my hand with the knife after honing with 600 grit and the knife got much sharper thereafter!
This holder is useful for a single knife; the bevel angle is built in initially and is not easily adjustable thereafter. Should you have multiple knives to sharpen you will likely need to construct a holder for each if you use this approach. This holder is useful for sharpening a "Profile C, Wedge Shape" edge as defined by Prof. Ellis. A Profile D could likely be approximated by taping a shim to one side of the knife during sharpening.
This holder works only with knives which are magnetic. I have checked knives from AO, Lipshaw, Reichert, and SLEE and all were magnetic; I suspect that all stainless steel used for microtomes is magnetic but check your knife to be certain.
My knife was in fair shape initially - the edge had been reground with a relatively coarse abrasive, perhaps 220, leaving a deep pattern of scratches. In addition, the bevel angles were not the same on both sides of the knife. My approach requires constructing a second holder if the angle is not the same on both sides of the knife so I refigured my knife in this holder to make it symmetrical using a 300 grit diamond hone applied dry. This was followed by hones made from 300, 600, and 1500 carbide paper glued to a wood block (shown in this picture), and lubricated with light oil as suggested by Prof. Ellis. Stropping was then undertaken in the same holder.
This simple holder can be constructed from scrap wood using hand tools. Ensure that the end of the middle block is exactly square vs the side of the block. Round the top edge of this block off so that the hone can contact the knife (at the approximate bevel angle already ground into the knife) while the knife edge is back several mm from the edge of the block. Use a square to mark a line at the position for the back of the knife.
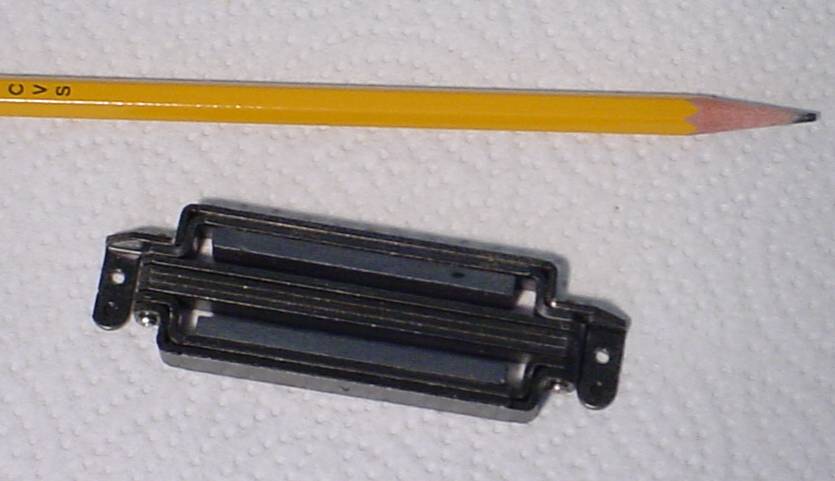
A magnet needs to be mounted so that it grips the back edge of the knife and holds it in the position chosen in the previous step. The magnet I used is from a discarded CD player motor (some computer disk drives have similar magnets); I routed a recess for the magnet's bracket but wouldn't do it this way again. It would be simpler to cut the angled part off the bracket and mount it as an upside down "U"; the magnet works even better from the side, no recess necessary. (Radio Shack sells magnets which might work but I try to use recycled parts.) Use the previously marked line to position the magnet so it holds the knife in the desired position, then use wood screws to secure the magnet. If your magnet is smaller or your knife is longer you may need two magnets located some distance apart to accurately fix and maintain the knife in position.
Once the magnet is fixed in position, add pins at both ends of the knife to ensure it doesn't slide along the magnet end-wise. Here is the second picture again, note the position of the pins. Leave 3mm or so space between the pins and the knife end so it is easy to install the knife into the holder. As usual, be very careful here since you're handling the knife: put the knife in place against the magnet, mark the positions for the pins, remove the knife and put it in a safe place, then drill the holes. I cut small sections from a couple of nails to make the pins, then just tapped them into holes which were drilled under size.
The top block, used to set the angle of the tool, is a piece from a 2x4 cut to length and then ripped to make the end approximately a square. The edge which will support the upper end of the tool (hone or strop) was planed slightly to angle it to approximately match the angle of the knife bevel. This was done to increase the contact area and thus reduce wear on this block by the tool. Ensure that the planed area is constant from end to end since inaccuracy here would cause the bevel angle to vary across the knife.
Place the knife into the holder between the previously installed pins. Place the upper block in its approximate position. Lay a steel straight edge in the tool's position at one end of the microtome knife. Use a 10x magnifier to view the match between the straight edge and the knife bevel; move the upper block forward or back to improve the match so that the angle set by the upper block matches the bevel angle previously ground into the knife. Generally, the straight edge should be about 3mm to 6mm above the rear edge of the knife to approximate the angle provided by the bevel guide included with a microtome knife. Any error in setting the bevel angle will require grinding steel from the microtome knife to force a match so perform this step carefully to minimize grinding later. Mark the position of the block and then use a square to extend the line across the width. Again, remove the microtome knife and put it safely aside. Use screws from the bottom of the middle block into the upper block to fix the upper block in position. Verify that the bevel angle matches and re-do this step if necessary. Inverting the holder onto a flat surface, verify that the upper and lower blocks contact the flat surface from side to side simultaneously: this allows you to judge whether they are accurately planar; a little sanding and/or planing of the upper block should correct any error.
Add the bottom block. The forward end of this block should allow the hone to clear by 1mm or so when it is in contact with the upper block and the knife. If the tool is raised off the upper block while contact is maintained with the knife, the lower block will contact the lower end of the tool and raise it off the knife, minimizing damage to the knife edge from bad technique. At least that is the concept. Screw the lower block to the middle block, again inserting the screws from the bottom so they don't show.
In a departure from Prof. Ellis' recommendations, I found that usable hones can be made inexpensively by rubber cementing carbide paper to a block of wood. If the paper gets dull, it is easily and cheaply replaced. The hone shown in picture two has 3 small pieces of carbide paper on one block: 300, 600, and 1500 grits. Honing should be an infrequent event undertaken only when the knife gets very dull or is nicked so use of the coarser grits should be uncommon. An even coarser grit, perhaps 220, is helpful when adjusting the angle as I had to do initially. I used oil to lubricate the paper and wiped the hone frequently on a paper towel to remove steel and worn abrasive, which seems to help keep the hone working well. The goal, of course, is to remove as little steel as possible from the knife while obtaining an absolutely smooth edge.
For a strop, I initially tried jewelers rouge I happened to have on hand, using oil to bind it to the strop. Jewelers rouge does work but is so slow I purchased some 1 micron and some 3 micron diamond paste (shown in the tubes) as suggested by Prof. Ellis. Softwood strops with diamond paste are far faster than jewelers rouge allowing fairly rapid completion of stropping. Half of a stirring stick, as supplied when purchasing paint, makes an excellent strop; glue a handle on one side and improve the flatness of the other side by sanding and/or planing before adding paste.
Prof. Ellis suggests using a stroke from the back of the knife toward the edge, angled somewhat along the edge of the knife. I used this technique and found that about a 45 degree angle worked well. The hone is lifted away from the holder and knife on the backstroke, then the upper end of the hone contacts the upper block followed by the hone gently contacting the knife during the forward 45 degree stroke. Several strokes are needed starting from one end and progressing along the knife, then starting over again at the end, etc. Pressure during sharpening strokes is moderate - a few ounces is enough. Once the knife's bevel angle matches the holder (even using coarser grit, this initial figuring of the edge can take a while), it takes about 15 minutes per grit to achieve all the needed effect from that grit. There are ways to cheat a bit here: when figuring the angle with coarse grit (220), glue a piece of 0.035 thick card under this grit which doesn't extend to the upper part of the hone. This will change the angle of the bevel very slightly, just enough so that subsequent grits (without the card) will work mostly on the part of the bevel nearest the edge, grinding away less steel to remove the scratches from the previous grit. With the coarsest grit I used a continuous circular motion rather than the 45 degree stroke used with subsequent grits - try this if you're feeling adventurous. On completion of sharpening I noted that only about two thirds of the bevel had a mirror finish, with some scratches visible in the part of the bevel farthest from the edge, a consequence of this cheating -- hard for this neophyte to say whether this affects how the knife performs in practice. My notion is that this cheating is similar in effect to hollow grinding, a technique used commercially when refiguring a microtome knife.
There isn't any way to cheat when progressing to finer grits; if you try to move to a finer grit too quickly then deep scratches and edge irregularities will become apparent later in the process and require returning to a coarser hone for removal of these scratches and irregularities.
The hone leaves scratch marks in the knife's bevel from the grit. I alternated directions of the 45 degree stroke by making a complete pass from left to right followed by a pass from right to left. Work for about a minute on one side of the knife, then work on the other side continuing to alternate sides until all marks from the prior grit are gone. This technique leaves a crosshatch pattern of scratches which are obvious when viewed with oblique light under a stereo scope. I then made several passes with strokes perpendicular to the edge using very light pressure, this to minimize the depth of scratches left with the grit in use and to ensure that only perpendicular scratches were left. Switching to the next finer hone and using 45 degree strokes, the perpendicular lines from the previous grit will disappear when honing with the new grit is sufficient; then use the same perpendicular stroke method in preparation for moving to the next finer grit. With the finest hone, leave the 45 degree cross hatching rather than moving to perpendicular strokes but use very light strokes to minimize the depth of scratches remaining.
Microscopes are your friends in judging when to move to the next finer grit. Careful examination of the scratch pattern left in the bevel area by honing is the best way to tell when it is time to move to the next finer hone. A stereo scope is excellent for evaluating the honing process and initial stropping progress. A compound scope with a combination of oblique top light plus bottom light gives an excellent view of stropping progress, where 40x and 100x are most helpful. The mirror finish apparent to the naked eye is initially far less attractive at 100x but improves rapidly with continued stropping.
Stropping is a continuation of the sharpening process but the goal is to polish the bevel and in the process perfect the edge, removing all visible scratches left by honing. In addition, there is often a very small (1 or 2 micron) curled edge of metal left at the very edge of the knife from honing which should be removed by stropping. The process is simply a continuation of the technique described above except that the result will be elimination of visible cross hatching as seen using the stereo microscope. Further, the sharpened edge should be free of visible peaks or valleys when viewed at 100x with a compound scope. After using the 3 micron strop I noted irregularities of 0.5 to 1 micron in the edge; these disappeared after about 15 minutes with the 1 micron strop, alternating sides of the knife frequently.
As a method of reducing the work required, check the knife area which is actually eligible for cutting in your microtome and only perfect the usable area. In my microtome the knife can only be moved a short distance sideways before it cannot be clamped, so only the central 3 inches or so of the knife could possibly be used. Longer knives are available and these offer an expanded cutting area but require more caution in use since the end of the knife extends beyond the clamp making it more hazardous in use (unless this exposed area is covered).
A knife which becomes slightly dull in use can generally be revived by stropping without honing unless the edge has been nicked in the useful cutting area; then re-honing and stropping should be considered. One text I read ("The Microscope and Its Use" by Munoz) suggested if only one or two nicks are present that they be marked with pen and then avoided -- it isn't worth the effort and loss of steel to regrind the whole knife simply to remove one or two small defects.
I found that when the knife looks good at 100x with the compound scope, showing no irregularities in the edge, then it is reasonably sharp. A secondary check (could be dangerous so you may want to avoid this old time test) is to shave a couple of hairs from the back of your hand. Take one of the hairs and try to cut it at a distance from the point it is being held; it should be possible to cut it at least 1/8 inch from the grip point. Some older texts said a sharp knife will cut a hair 1/2 inch from the grip point but I have not been able to achieve this. I found that the knife catches the hair and slices it at an angle rather than just going straight through so my sharpening technique may need a bit more work...
Once the knife is sharpened, protect it with a coating of oil or vaseline to prevent oxidation of the surface during storage. Carefully remove this coating prior to use to avoid sections sticking to it.
Diamond paste is available from a number of sources. I checked on eBay and found a vendor offering it, emailed him and bought two 10g tubes, one of 1-3 micron paste and a second of 0-1 micron paste for $16 delivered. This paste was produced by Oshmens Corp Ltd. of Hong Kong and sold by a vendor from Hong Kong ( rvm@onebb.net ). Paypal allowed immediate payment and the paste arrived in less than a week via air mail - amazing considering the distance. 10g is a lot of paste - I used less than 0.1g of each to sharpen the knife so this may be a lifetime supply.